
Sublimation on wood sounds exciting but it comes with multiple challenges. Wood is a porous material so it can absorb dye unevenly which can result in blurry designs or inconsistent colors.
Also, the moisture content on wood can affect the printing process. If the wood you are trying to print has high moisture content then it can result in poor adhesion of ink. You may also face issues in reaching optimum heat press settings, but despite these issues I tried printing wood and to be honest my results were amazing.
After that I printed various wooden substrates like coasters, wooden keychains, photo panels, ornaments, plaques etc and with some hit and trial I was able to print them properly. With hands-on experience of around one year I have mastered the right method to sublimate woods and here is a detailed guide for you.
What is sublimation on Wood?
Sublimating wood is an innovative and unique printing method which allows you to print high – quality and vibrant images on wood. It provides a creative method to personalize and customize wooden items like plaques, photo frames, signs etc.
The process includes transformation of solid dye ink to a gas state which permeates the wooden surface and makes a permanent bond with its fiber. This method ensures fade – resistant and long – lasting prints which retain their vibrancy for years.
How to prepare and pre-treat wood?
Before initiating the sublimation process it is important to prepare and pre-treat wood properly. It will ensure that the design adheres well on the surface and results in long lasting and vibrant prints. Here are the steps to follow.
1. Sanding and surface cleaning
Initial step includes thoroughly cleaning the surface. It is important as any debris, dust or dirt in wood can interfere with the printing process and can affect final output.
Make sure to use mild detergent or cleaning solution for removing grease or stains. Gently scrub the surface with soft cloth or brush, paying attention to any corner or crevices.
After cleaning, it is necessary to sand the surface for creating smooth and even texture. It helps to remove any previous coating, imperfections or rough patches on the wood, begin with the coarse grit sandpaper and then gradually move to the finer grit for a proper polished finish. Make sure to sand in the direction of wood grains to avoid leaving any visible scratches.
2. Apply base coat
When sanding is done, it is important to apply base coat on wooden substrate. This basecoat helps to seal the wood and offer a smooth surface for the design. It also enhances the clarity and color of the prints.
For applying the base coat, always use high quality wood sealer or prime. Evenly apply the primer using a roller or brush.
Make sure to follow instructions provided by the manufacturer. This method will ensure that the wood is adequately protected and is ready for sublimation.
Dye – sublimation printing process on wooden substrates
This process includes a series of steps and particular material to get the desired results.
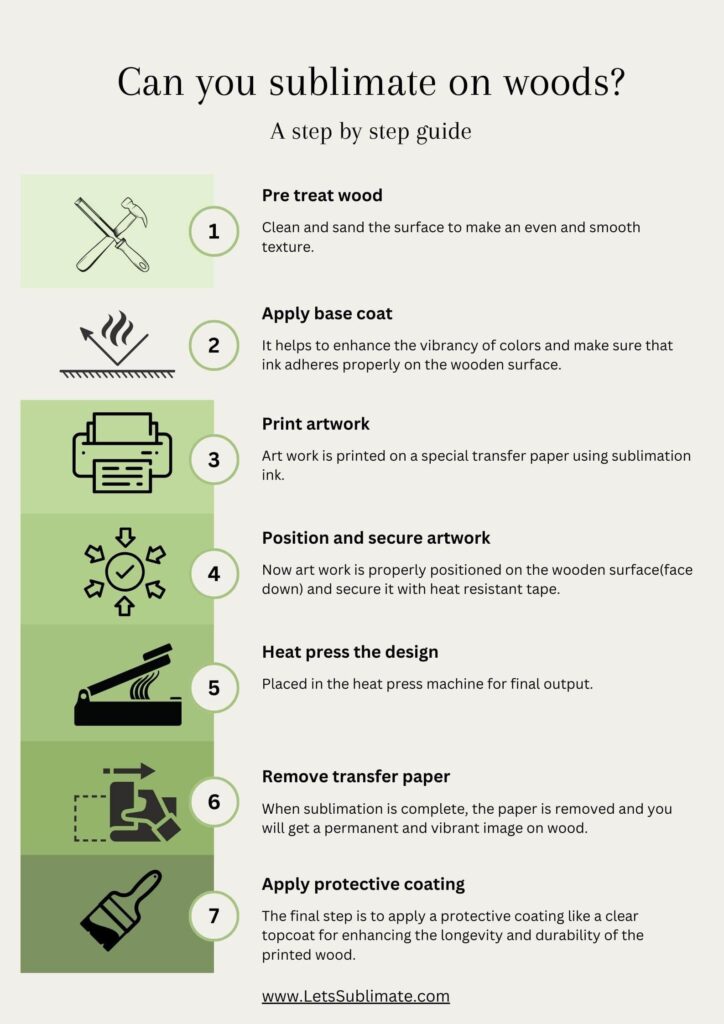
1. Pre-treat wood
First you would need a suitable wood substrate which is properly prepared and pre – treated. It includes cleaning the surface and then sanding it to make an even and smooth texture.
2. Apply base coat
After this a base coat is applied on the wood which helps to enhance the vibrancy of colors and make sure that ink adheres properly on the wooden surface.
3. Print artwork
Once the base coat on wood is dried, the artwork is printed on a special transfer paper using dye – sub ink.
4. Position artwork and secure it
After printing the image on transfer paper, it is then properly positioned on the wooden surface (face down) and secure it with heat resistant tape.
5. Heat press the design
Next it is placed in the heat press machine for final output. The heat press machine uses the combination of pressure, heat and dwell time (dwell time is the duration the transfer paper and wood states in the heat press machine) for activating the sublimation process.
6. Remove transfer paper
When sublimation is complete, the paper is removed and you will get a permanent and vibrant image on wood.
7. Apply protective coating
The final step is to apply a protective coating like a clear topcoat for enhancing the longevity and durability of the printed wood.
Protective coating for finalizing sublimated wood
When wood sublimation is completed, it is important to apply the protective coating on the wood to make it more durable and resistant to fading. The protective coating also acts as the barrier and provides a shield for sublimated image from general wear and tear, moisture and UV rays.
For protective coating you can use polyurethane, varnish or clear lacquer. These coatings offer glossy matte finish, increasing the appearance of sublimated image and offering protection to it. Also, do not forget to follow the manufacturer’s instructions for applying the protective coating to get the best result.
Recommended coating and finishing products
| Products | Description |
| Fine – grit sandpaper | It is used for gently sanding the wood for removing any imperfection and creating the smooth canvas. |
| Clear topcoat | The protective layer which enhances the appearance of printed wood and prevents fading, moisture damage, and scratches. |
| UV protection coating | It protects sublimated wooden material from discoloration and fading caused by UV rays, mainly when exposed to sunlight. |
| Wood stain or dye | Use this if you wish to enhance the grain and color of wood and to add character and depth to the prints. (optional) |
| Sealant | This offers an extra layer of protection against environmental factors, moisture, preventing wood deterioration or warping. |
What are the benefits of sublimating a wood?
After understanding how can you sublimate on wood you should also know that offers a range of benefits which make it a popular choice for making long – lasting and vibrant prints. With durability, customization options and resistance to fading, this method has opened up countless possibilities. Here are some benefits to sublimate wood.
1. Long – lasting and vibrant prints
This printing process lets the ink transfer directly to wood fiber resulting in vivid and rich colors which truly pop. Unlike other printing methods, dye – sub allows the ink to penetrate in the wooden surface, making seamless integration which enhances overall visual appeal.
Additionally the prints on wood are highly fade resistant as the ink becomes part of wood which makes it less susceptible to the effect of daily wear and tear and UV rays. It also ensures that the design maintains its quality and vibrancy for multiple years.
2. Customization options
Wood sublimation has opened doors to a huge range of customization options, permitting you to bring the creative vision to life. Whether you are an artist or a business owner who wants to showcase their artwork, wood printing can easily cater your needs. The versatility of this method means you can easily make unique pieces which reflect your personality and style.
3. Resistant to fading and durable
Wood is naturally robust material and when it is combined with the process of sublimation, it becomes even more resistant to scuffs, scratches and general wear & tear. This makes printed wood ideal for multiple applications like home decor, outdoor installations etc.
Also, sublimating wood provides excellent resistance to fading. The ink integration with wood fibers makes sure that the color remains true and vibrant, even when exposed to harsh environments or sunlight.
Conclusion
Sublimating wood is the most creative way to showcase your unique style of designing. By following the above guidelines, you can understand how easily can you sublimate on woods and can create stunning art pieces easily. If you want to share any other tips on wood sublimation, mention it in the comments. If you have any questions or need any clarification, message me directly.
FAQs
Q- What is the optimum temperature for sublimating wood?
Printing wood need optimum temperature to achieve the desired outcome. So, your heat press should be set between 400-425°F to get best result. If the heat press is set at less temperature, then you may not get the right print, and if it is set at very high temperature then you may damage the wooden substrate.
Q- How much time will it take to sublimate the wood?
Generally, it will take around 1 – 5 minutes. But it also depends on the thickness of wood, and ink used. If the wooden material is thin then you can transfer design in around a minute, but if the substrate is thick then you may need to press it for around 5 minutes to get the correct result.
Q- Can you sublimate a wood cutting board?
Yes, you can easily print wood cutting boards, but you need to make sure the cutting board you are printing is pre – treated and is ready to accept the sublimation ink. If the substrate is not ready for accepting the ink, then you will not be able to print your design on it.
Q- Can you sublimate on natural wood pieces?
Yes, you can sublimate on natural wood. But do not forget to use PolyNatural coat for enhancing the finished outcome. Natural wood is not capable to accept the dye – sub ink so it is mandatory to coat it so that you get a polymer coating for printing designs on it.
Q- Can any type of wood be used for sublimation?
Yes, dye – sub printing can be done on different types of wood, but make sure it is painted with light color, sanded and smoothen for better color vibrancy. It should also be pretreated with Polycrylic coating to ensure correct adhesion and ink transfer.
Q- Do I need special paint for sublimating wood?
Yes, a light colored, usually white, semi- gloss paint is recommended to help the colors stand out and to ensure a smooth transfer surface.
Q- How to prepare wood for dye – sub printing?
Sand the surface smooth and apply the coating of light – colored paint, follow up with the coat of water – based Polycrylic, again sand it lightly and ensure it is wiped clean and is fully cured.
Q- Is it important to mirror the design while printing it on wood?
Yes, always mirror the design before printing to ensure the correct image transfer on the wooden surfaces. If you will not mirror the design then you will get an inverted image in your final outcome. There are sublimation printers which have the option of printing inverted image. Make sure to use this option while printing the design.
Q- Do I need to seal the sublimated wood?
Sealing is an optional step, but applying the final layer of Polycrylic can enhance the appearance and protect the artwork. Although the dye-sub process itself is durable and permanent.
Q- What should I do if the wood warps after sublimating?
Sometimes it happens. You can place the heavy object like a book on the top of printed wood overnight to help flatten it. This is most common and can happen multiple time after sublimating the wood. You should not be worried as with a simple trick you can get the right printed material.
Q- Can wood substrate be sublimated?
Yes, you can sublimate wood. However, the type of wood you use may affect the result, so make sure to choose uncoated wood if you desire more vibrant prints. Always ensure to seal the substrate before printing. It will also help to prevent ink bleeding.
Q- What kind of wood can be sublimated?
The best type of wood is uncoated wood. But if you want to print painted wood, make sure it is dry and ensure to seal it with lacquer or sealant.