Without proper knowledge of the heat press, you won’t be able to do sublimation correctly. Yes, it is true. When I began my journey, I had very little information about using it correctly, and due to this, I had to face a major loss (monetary loss) due to incorrect output. I wasted so much ink and spoiled multiple substrates, but with time, I learned how to correctly use the sublimation press.
Now I am excited to share my passion for heat pressing and the creative possibilities it opens up. As someone who has spent countless months experimenting with various materials, techniques and designs, I know how amazing a heat press can be.
Whether you are a DIY enthusiast or a seasoned pro, you should know how to heat press correctly.
After testing multiple heat press machines and experimenting with different materials, I learned that correct temperature and pressure settings make the biggest difference in print quality.
Common beginner mistakes can lead to faded prints, ghosting, or damaged fabric, but these issues are easy to avoid once you understand the basics. Let’s learn about it.
What is a Heat Press Machine?
A heat press machine is the device which uses controlled time, pressure and heat for transferring designs on material like ceramics, metal, mugs and fabrics.
These machines are commonly used for
- Promotional Products
- Mugs
- Custom t-shirts
- Heat Transfer Vinyl (HTV)
- Sublimation Printing
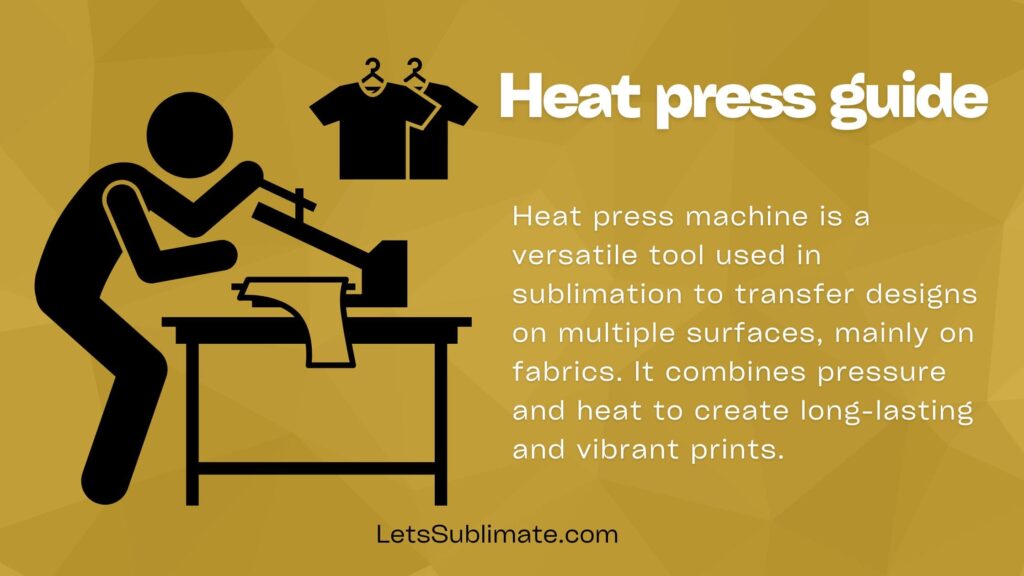
How Does a Heat Press Machine Work?
This machine is a versatile tool used in dye – sub printing for transferring designs on multiple surfaces, mainly on fabrics. It utilizes the combination of pressure and temperature to create long lasting and vibrant prints. The main working principle of this machine include three main components
1. The platen
It is also known as a heating element which is a part of a machine that generates and distributes heat. It is mainly made of aluminum and gets heated using either gas or electricity. The platen’s temperature can be easily adjusted according to the type of material being used and the desired result.
2. The transfer paper
It carries the design which will be transferred on the substrate. The design is then printed on the transfer material using special dyes or inks, based on the printing method. The transfer material is then placed on the top of the substrate with the artwork facing down.
3. Substrate
When the dye – sub press is activated then the platen presses down on the substrate and transfers material by applying pressure and heat. This temperature causes the dye or ink on the transfer material to convert into the gas which permeates the fibers of the substrate. As platen is removed, the gas is reverted to solid state and makes permanent bonds with the fabric.
Types of Heat Press Machines
Heat transfer machines come in multiple sizes and types, each catering to various printing needs. Here are a few common pressing machines which you can use.
1. Swing Away
It has the top platen which swings to the side, offering easy access to the lower platen. This design allows greater precision and complete flexibility during the printing process.
2. Clamshell
This machine resembles the clamshell with the top platen opening and the closing like clamshell’s shell. It is very compact and easy to use, which makes it suitable for small scale printing projects.
3. Rotary
This machine is designed for large scale production which require continuous printing. It features the rotating drum which applies heat and pressure to fabric when it passes via the machine. This pressure machine is perfect for printing on rolls of fabric or huge counts of garments.
4. Draw
In this machine, the lower panel slides like the drawer which makes it convenient for loading and unloading garments. It is commonly used in commercial printing settings.
Best Heat Press Machines (Top Picks for 2026)
Selecting the right heat press machine can significantly improve your printing results. Here are my recommended best heat press machines you can consider.
Cricut EasyPress 2 (Best for beginners and small projects)
- Perfect for home use.
- Even heat distribution.
- Compact and easy to use.
F2C 5-in-1 Heat Press Machine (Best for budget users)
- Good for beginners
- Affordable
- Multipurpose (caps, mugs and t-shirts)
PowerPress Industrial Heat Press (Best for small businesses)
- Durable build
- Consistent pressure
- Large 15×15 plate
VEVOR Heat Press Machine (Balanced performance and best value for money)
- Good build quality
- Accurate temperature control
- Digital control panel
My recommendation
If you are just starting out, go with Cricut EasyPress2.
If you run or plan to run a business, choose PowerPress or VEVOR
Heat Press Machine Comparison
| Machine | Best For | Type | Size | Price | Temperature Range |
| Cricut EasyPress 2 | Beginners | Portable | Small | Mid | up to 400°F |
| F2C 5-in-1 | Budget users | Combo | Medium | Budget | up to 450°F |
| PowerPress | Business | Clamshell | 15×15 | High | up to 450°F |
| VEVOR Heat Press | Value users | Clamshell | 12×15 | Mid | up to 480°F |
Materials Needed for Heat Press Printing
For proper execution of printing steps, you require below material.
1. Transfer paper
Transfer paper is used in the dye – sub process as it enables the transfer of design from paper to fabric by simply converting ink to gas using pressure and temperature.
2. Heat Transfer Vinyl
It is a special type of vinyl which can be cut in designs and can be transferred to fabrics using a temperature source. It comes in multiple colors, textures and finishes, permitting endless design possibilities.
3. Ink
Sublimation is done with special ink which is designed to turn into gas upon heating. It is designed to turn into gas when heated and allow ink to make bonds with fabric permanently.
4. Heat – Resistant Tape
This tape is used to secure transfer material on the substrate during the process. It also ensures the design does not move or shift while printing.
5. Protective Paper
It is also known as release paper or Teflon sheet which is placed between the transfer material and platen to prevent any adhesive or ink from sticking to the platen.
6. Heat Resistant mat
This special mat offers a protective surface for the pressing machine to rest on. It also helps to prevent any damage to the underlying surface and also offers insulation against heat.
How to select the right fabric?
When it comes to temperature printing, selecting the right fabric is important for getting best results. Not all materials are created equally but some of them work better with dye – sub press machines than others. Let’s check out the best fabric and how you can prepare them for printing.
Best fabric for temperature printing
If you want to get long – lasting and vibrant output, it is necessary to select the fabric which is suitable for this printing. Some best fabrics are.
1. Polyester
It is an excellent material which is popular for its ability to retain vibrant colors, even after multiple washes. This fabric is mainly used in promotional items, activewear and sports jerseys. It offers a smooth surface, thus offering detailed and sharp prints.
2. Poly – Cotton Blends
Blended fabric which combines cotton and polyester provides best for both worlds. It offers the breathability and softness of cotton, along with the durability and vibrancy of polyester. These blends are mainly used in the garment industry and are best for various applications.
3. Cotton
Now cotton is also among the most popular fabrics for heat press printing. It is durable, breathable and readily absorbs the ink. It can sustain multiple washing which makes it a great choice for making tote bags, personalized t-shirts etc.
Fabrics to avoid for sublimation press printing
There are some fabrics which as per my experience are not good for temperature printing. So, these fabrics should be avoided. These will not produce satisfactory results, or they may even damage the heating machine. These are.
1. Nylon
It is not ideal for printing with a dye – sub press as they have a very low melting point. The high temperature of the device can cause fabric to wrap or melt, resulting in distorted prints. If you still want to work with nylon, then I recommend using lower heat settings and doing a sample test beforehand.
2. Rayon
This delicate fabric can shrink, or it may lose its shape when exposed to high temperature. Pressing rayon can result in uneven printing or it may cause damage to fabric. It will be best to avoid the usage of rayon unless you have some previous experience and are aware of handling them properly.
3. Silk
Silk is the most luxurious fabric which needs utmost care. Printing on silk can be very challenging as the pressure and temperature can cause fabric to discolor or to lose its texture. For experimenting with silk, I recommend using low temperature settings and beginning by printing small areas.
Preparing substrate
Before initiating the design transfer machine printing, it is mandatory to prepare the fabric properly. It will ensure optimal results and will also help to prevent any issue during the printing process. Here are some steps to follow when you are preparing the fabric for printing.
1. Washing
It is important to wash the fabric before printing as it will remove residues, chemicals or dirt. Always use mild detergent and follow fabric care instructions. Never use softeners as it can create the barrier which hinders the absorption of ink.
2. Drying
After washing the fabric, make sure to dry it properly. Opt for the drying method which is suitable for your fabric. It is also recommended to air dry or use low heat settings in the dryer. Also avoid exposing the fabric to high temperature as it may cause damage or shrinkage.
3. Ironing
Once your substrate is dry, you have to iron it to remove creases or wrinkles. This step is crucial as wrinkles can interfere with the process of design transfer and can also affect the quality of print. You need to set the iron to the appropriate temperature for the fabric and iron both sides of the fabric.
By adhering to these preparation steps you need to make sure that the fabric is smooth, fabric and ready for printing. This sets the stage for the successful printing process and also helps to achieve processional looking results.
How to prepare design for digital press printing?
The most crucial step in heat press printing is the preparation of design. Whether you are making your own design or selecting a pre-existing design, it is mandatory to pay attention to details. Let’s check out the mandatory aspects of design preparation.
1. Choosing or creating a design
Making design is the initial step in design preparation. If you have the creative side and want to make your design personalized then you can create your own art work using any graphics design software or you can also go for hand drawn art work.
It will allow you to unleash creativity and come up with the custom and unique design which purely represents your style.
But if you are not confident enough in your artistic skills or if you do not have time to make your own design then there are multiple pre – made designs which are available across the internet.
Online marketplaces and designs platforms provide a huge range of designs which caters to various industries, styles and themes. You can easily browse the multiple options to find the design which suits your needs.
2. Placement and sizing of design
Once the design is created/selected, the next step is to identify the appropriate placement and size. The size of artwork is based on various factors like size of substrate and the overall aesthetic which you wish to achieve. It is also important to consider the dimensions of the pressing machine and the printing area it offers.
You have the freedom to choose where you would like to place your design on the substrate. Some common placements are chest area, center or even sleeves. For items like accessories and bags, you may want to consider the aesthetically pleasing and most visible spot.
For ensuring the correct size and right placement, it is recommended to use the temperature press layout template or tool. These tools will give you grids and guidelines which will help you to visualize how the design will look on your substrate.
With the help of this beginners guide to use heat press, you can also ensure that the artwork is properly aligned and is centered.
Now for preparing the design you have to follow below steps.
- It is important to save the design file in correct file format. Many heat press machines accept the design in vector format like EPS and SVG as these formats allow for scalability without losing the image quality.
- If you are interested in using the raster image format like PNG or JPEG then it is mandatory to make sure that the resolution of artwork should be high as low resolution images will blur or pixelate prints.
- You have an image resolution of minimum 300 DPI(Dots Per Inch) for optimal quality prints.
- You should also need to consider the color separation if the design is containing various colors. It is also important for the design which requires precise color matching. Color separation also includes separating the design in various layered based on the colors used in printing. It will allow easier printing and will also make sure that every color is applied properly.
- At last before sending the design for heat pressing it is mandatory to perform a sample test. It will allow you to judge the quality and appearance of the design on a very small scale before printing the bulk project. After a sample test you can make required corrections or adjustments for ensuring the best possible outcomes.
Design preparation checklist
For your ease I have created a design preparation process checklist which can be easily followed for any type of design.
- Create or choose the design.
- Determine the right sizing.
- Finalize the placement of design.
- Use a pressing machine layout template or tool.
- Make sure the design is in the right file format.
- Check design resolution
- If required, perform color separation.
- Do a sample check and make necessary adjustments.
With this checklist you can easily prepare the design for getting professionally looking results.
Tips for Using a Heat Press Correctly
While pressing he design it is necessary to keep in mind some essential techniques as they will help you achieve best results. These are.
Time and temperature settings
The critical factor in design press is obtaining the right time and temperature settings. Various designs and materials need specific heat applications for ensuring a successful output. Here are some tips you can follow.
1. Know your fabric
Every fabric has its own heat tolerance. It is mandatory to research and know the right temperature range of the fabric you are using. Polyester needs a lower temperature in comparison to cotton. Using too low or too high temperature can result in poor quality transfer.
2. Sample test
If you are working on a big project then it is mandatory to do a sample test on a small piece of fabric. It will let you determine the right time and temperature setting for the material and design you are using. You can keep a record of these settings for future work also.
3. Adjustment for design complexity
Intricating designs with various colors will need different time and temperature settings. Generally, longer processing times and higher temperature are required for complex designs for ensuring proper ink adhesion and penetration in the substrate.
4. Pre – heat the fabric
Pre heating the fabric before printing any design will ensure that the substrate is free from wrinkles or moisture, allowing better ink transfering.
5. Consider pressing machine type
Different machines have variations in the temperature accuracy. It is mandatory to understand the capabilities of the specific machine and then make required adjustments accordingly.
Ensure proper pressure
Align with the right time and temperature settings, applying correct pressure is also important for a successful print. Some tips which you can follow are.
1. Balance the pressure
If the pressure is uneven then it can result in uneven ink transfer or printing incomplete design. Make sure that the pressure is applied evenly across the entire platen. You can do so by adjusting the pressure knob or you can use pressure distribution tools.
2. Consider fabric thickness
If your fabric is thick then it will need more pressure for proper ink penetration. You need to adjust the pressure accordingly to accommodate the thickness of fabric you are using.
3. Use heat resistant pad
Placing the temperature resistant pad or the Teflon sheet between the platen or fabric can help to distribute pressure evenly and protects the substrate from sticking or scorching.
4. Avoid excess pressure
It is mandatory to apply the right pressure for successful transfer. If the pressure is too much then it can result in fabric distortion or ink bleeding. Find the right balance of pressure by testing various pressure levels and observing the outcomes.
Recommended Heat Press Setting Chart
| Material | Temperature | Time (Seconds) | Pressure |
| Polyester | 375–400°F | 45-60 | Medium |
| Cotton | 385–400°F | 45-60 | Medium |
| Poly-cotton blend | 370–385°F | 40-50 | Medium |
| HTV Vinyl | 305–320°F | 10-15 | Medium |
| Sublimation Mugs | 400°F | 180-240 | Medium |
| Ceramic tiles | 400°F | 180-240 | Medium |
Common printing mistakes you should avoid
Even if you are following the right techniques, heat press printing can sometimes come with its own challenges. Some of common mistakes to avoid are.
1. Improper alignment
Make sure your design is properly aligned on the fabric before pressing. You can use alignment templates of tools for proper positioning of the design. If the design is misaligned then it can damage the entire print.
2. Overheating
If you are applying too much heat then it can scorch the fabric or the ink will spread irregularly. So you should follow recommended time and temperature settings for the specific design and material for avoiding overheating.
3. Less pressure
If very less pressure is applied then the ink will not be completely transferred to the substrates and the outcome will be incomplete or faded design. Always make sure to double check the pressure settings and make necessary adjustments as required.
4. Using wrong transfer paper
Various transfer papers are available. You should choose the one which is compatible with the ink type and dye – sub press machine.
5. No proper cleaning of platen
Regularly cleaning of platen for removing any ink buildup or residue is necessary as it will ensure even heat distribution and will also prevent any stains or unwanted marks on future prints.
With these techniques and by avoiding common mistakes you will be well on the way to making professional quality prints.
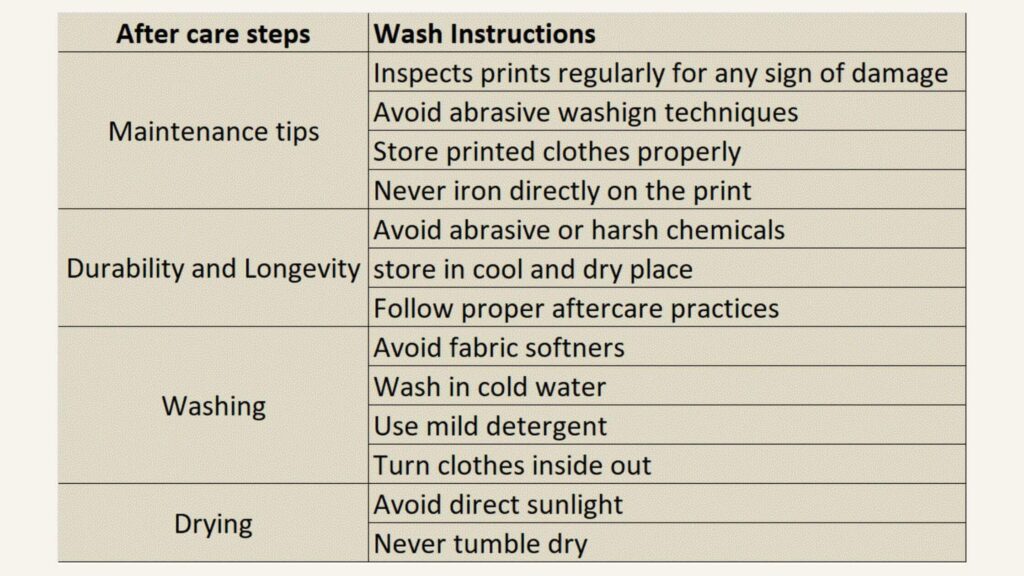
Aftercare Instructions for Heat Press Prints
1. Drying and washing instructions
Taking proper care of the printed substrates is critical for maintaining their longevity and quality. When it comes to washing and drying you need to follow the below steps.
- Use mild detergent – While washing the printed material it is mandatory to use mild detergents as harsh detergents or the use of bleaches may cause damage to the prince.
- Wash in cold water – Printed items should always be washed in cold water to prevent any fading or color bleeding. Never use hot water as it can cause the print to deteriorate prematurely. Cold water will also help to preserve integrity of fabric and can prevent shrinkage.
- Turn material inside out – For protecting the garment it is recommended to turn the fabric inside out before washing. It will help to minimize friction among the print and other items you are washing.
- Avoid fabric softener – Fabric softeners can leave residue on the clothes as it can affect adhesion of print. However, you may use fabric softener which are made specifically for printed items.
- Never tumble dry – Heat and agitation in tumble drying can cause prints to peel off or crack. Instead, you should air dry your printed clothes.
- Avoid direct sunlight – It is important to keep your sublimated item out of sunlight reach as it can cause fading. Dry your clothes in shade.
How to maintain durability and longevity of prints?
The prints generated by digital press machines are known for their longevity and durability if proper care is taken. But if you will follow right after care practices then you can extend the lifespan of the prints and can enjoy its amazing appearance for longer duration.
These prints are designed to withstand the normal wear and tear, which makes them suitable for everyday use. The high quality process makes sure that the prints adhere firmly to the fabric, preventing them from cracking or peeling easily.
But it is important to note that the durability and longevity of the prints can vary based on multiple factors like printing technique employed, quality of material used and after care practices followed.
By following the wash and drying instructions (mentioned above) you can easily prolong the life of the prints. Additionally, I advise you to avoid using harsh chemicals or any abrasive materials while cleaning the prints as they may cause damage.
Also, store printed garments in dry, cool places and away from excessive moisture or direct sunlight. It will help to prevent any potential damage and will make sure that the prints remain intact and vibrant.
Tried and tested tips for maintaining prints
Right maintenance is the key for preserving the appearance and quality of the prints. But here are some additional tips which I personally use for maintaining prints effectively.
1. Proper storage
When you are not using the printed stuff then fold them neatly in a dry closet. You can even hang them in the hanger. But make sure the closet is not overcrowded as it can result in creasing thus damaging the prints.
2. Do Not iron directly
Never iron directly on the prints as it will distort or melt. If you want to remove wrinkles from the clothes then turn them inside out and then iron. It will be best to use a pressing cloth for protecting the print.
3. Avoid abrasive washing
Rubbing or scraping the prints vigorously while washing can lead to their deterioration. Instead you should gently hand wash or use the machine’s gentle cycle for minimizing any potential damage.
4. Inspect prints regularly
Always check the prints regularly for any sign of damage. If you see any cracking or peeling, you should take immediate action to prevent any further damage. Replacing or repairing damaged prints can help to extend the lifespan.
Here is a quick aftercare instruction table for your ease
Advantages and Disadvantages of heat press printing
Advantages
This printing method offers various advantages which makes it a popular choice for multiple individuals and businesses.
1. Quick production
It permits efficient and quick production which makes it more suitable for tight deadlines and bulk orders. Due to the simplicity of the process, this is best for beginners, eliminating the need for technical skills or extensive training.
2. Versatile
With the right materials and equipment, a digital press can be easily used on multiple surfaces, expanding its range of products which can be easily customized. Due to this versatility, you can make a huge range of products.
Disadvantages
It is always important to know some disadvantages of the heat press printing.
1. Durability
The prints may last longer when proper care is taken but they may not be as durable as the prints from other printing(screen printing) methods.
2. Compatibility
This printing is not suitable for all types of fabrics. Some delicate fabrics like lace or silk cannot withstand the high heat needed for printing. So it is mandatory to consider the compatibility of fabric while printing.
Conclusion
This ultimate guide to printing provides a versatile and convenient method to transfer artwork on multiple surfaces. If you are new to this printing method, follow above techniques and you can print an amazing design effortlessly. If you have any opinion, share it in comments or message me.
Frequently Asked Questions
Q – Is a heat press better than iron?
Using iron can easily scorch, burn or leave a weird mark on your substrate when pressed. Generally, irons are not designed for heat transfer printing. Also, sublimation printing required controlled temperature, pressure and time and all these settings are not available in an ordinary iron. So, it is recommended to use a high quality heat press to transfer designs on substrate.
Q – Can you heat press 100% cotton shirts?
Printing 100% cotton shirts needs the highest temperature which is around 380 degrees fahrenheit. However you should begin with a low temperature of 270 degree fahrenheit and then gradually increase the temperature. It will prevent damaging the substrate. However I recommend referring to a heat press machine’s manual for the right temperature and then doing a sample test to get the desired outcome.
Q – What kind of fabric can be heat pressed?
If your fabric is made of polyester or cotton then you can easily heat press it with controlled time, temperature and pressure. However if the substrate is made of rayon or silk then you should carefully do the heat pressing as they are sensitive to heat and pressure. For other materials also you should follow heat press optimum time and temperature settings to save it from burning.
Q – Can you heat press 100% polyester?
Yes, you can heat press your 100% polyester substrate, but if you are pressing it with HTV then I recommend using low temperature and longer press time with medium pressure. Using high heat can cause material to scorch.
Q – Can a heat press be used at home?
Yes, a heat press machine is safe to use at your home press because now machines are portable and lightweight so you can keep them at your home for DIY printing.