
Sublimation process is a rewarding craft, but like any other art form you have to face some challenges while learning it.
I have spent countless days experimenting and mastering this art and trust me, I made multiple mistakes in my journey.
Whether you are a beginner or an experienced crafter looking to refine the skills, you can skip the frustration of failing and can learn from my 10 common mistakes mentioned below.
Quick Answer
The very common sublimation printing mistakes include using incorrect temperature, low polyester material, wrong paper placement, insufficient pressure, poor quality ink and moisture in the substrate. These mistakes can result in faded prints, dull colours, ghosting and incomplete transfers. Using correct heat settings and high-quality sublimation supplies can help to achieve vibrant results.
1. Banding in sublimation printing
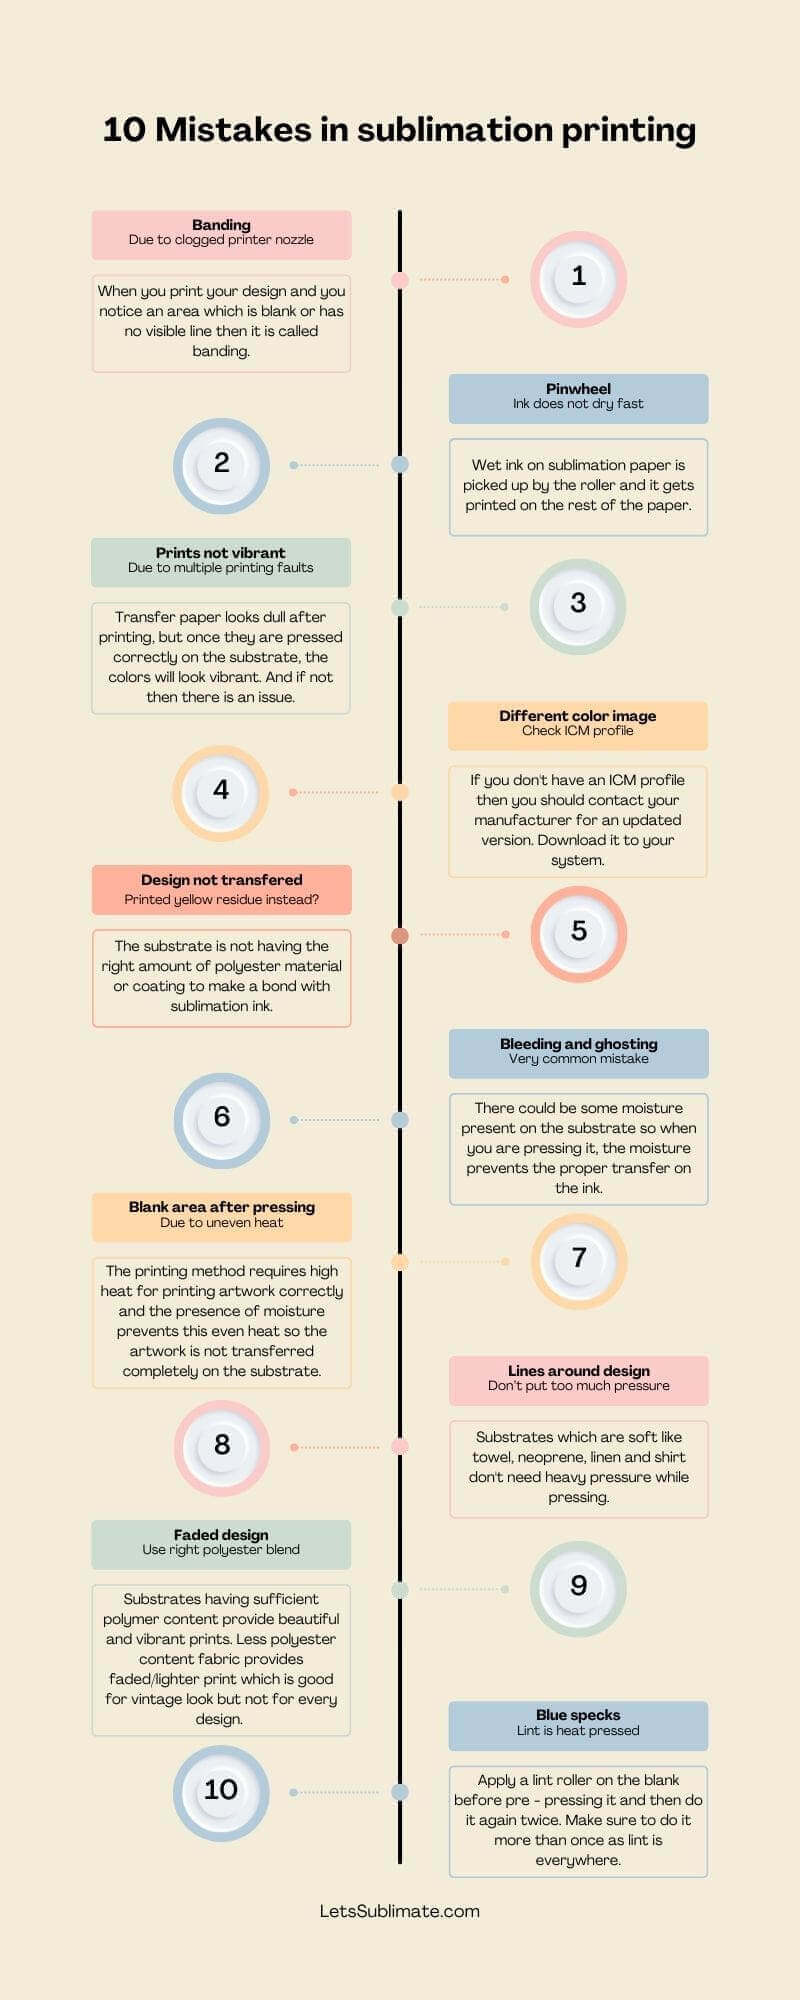
When you print your design and you notice an area which is blank or has no visible line then it is called banding.
It is formed by a clogged nozzle of the printer, which does not let ink flow out while printing. The main cause is the dried ink in the print head, a clog in the line, so that the ink does not reach the print head.
Or it may be because of a ruined print head. It is always a good idea to use a printer regularly so that print heads remain working and ink does not dry up. For better performance, you should use a self – maintenance printer, but if you don’t have it, just keep printing something once in a while. Check out my complete guide on the best printer for sublimation.
If you have a regular sublimation printer, I recommend printing one transfer a week. And if the printer is unused for a long time, you should do a nozzle check before printing.
If the printhead pattern is missing any line then you may have to clean the printhead simply by printing a full page bleed for unclogging the lines.
After this you should run another nozzle check and if the same thing happens repeat the cleaning process and run one more nozzle check. If still you are seeing same issue then you have to clean the printhead with denatured alcohol.
Quick Fix
- Run printer nozzle cleaning from printer settings
- Print a small colored design every 2–3 days to prevent ink drying
- Use high quality sublimation ink compatible with your printer
- Avoid leaving printer unused for long time
- Check ink levels regularly
Note – Banding usually happens when the print head gets partially clogged.
2. Pinwheel marks on sublimation paper
These are also known as pizza wheel marks or roller marks, which are present on the sublimation paper in the form of dotted lines. They will get transferred to the substrate when they are pressed. Check out my complete guide on what sublimation paper is to select the best paper for your project.
It is mainly caused when ink on the paper is not drying fast. The wet ink is picked up by the roller and it gets printed on the rest of the paper. So, make sure to use high quality paper which is compatible with your printer. Also, turn off high speed printing. It will slow down the printer and will allow some time for your ink to dry.
Quick Fix
- Allow printed sublimation paper to dry properly before heat pressing
- Use high quality sublimation paper with fast drying coating
- Reduce printer speed to improve ink absorption
- Avoid touching printed area immediately after printing
Note – Wet ink causes roller marks on paper.
3. Sublimation print colors look dull
If the sublimation paper receives dull prints then it can either be normal or a problem.
Normally transfer paper looks dull after printing, but once they are pressed correctly on the substrate, the colors will look vibrant.
But if the pressed images are still looking dull then it may be because of
- You may have printed on wrong side of the transfer paper. Many transfer papers have a watermark on the back side, so always make sure you are printing on the non watermarked side of the paper. But if you are working with paper which does not have any water mark then choose the brightest/whitest side to print.
- Make sure you are using high quality sublimation ink which is compatible with your printer and transfer paper.
- Missing ICM profile. Many ink manufacturers provide ICM profiles. So check and ensure you have downloaded it and you are working with the latest version.
- You are not working with high quality images as the images which are of low quality or small will result in poor quality prints.
Check out my complete guide to sublimation printing to learn the basics.
Quick Fix
- Increase temperature slightly (within recommended range)
- Use polyester coated blanks for better ink bonding
- Use high resolution design (300 DPI)
- Check ICC color profile for accurate color output
- Ensure correct heat press pressure
Note – Low temperature or wrong material causes dull colors.
4. Sublimation color looks different after pressing
When the computer system is showing different colors of image then what you get after pressing on the substrate, it may be due to a missing ICM profile. If you don’t have an ICM profile, then you should contact your manufacturer for an updated version. Download it to your system and use it.
Another issue could be due to your heat press settings. When you are not using the right amount of heat for your substrate, it may cause a colour issue. To learn more about heat press settings, see this guide.
Quick Fix
- Install correct ICC profile for your printer model
- Ensure temperature is correct for your substrate
- Use high quality sublimation ink
- Avoid using low resolution images
- Always perform test print before final pressing
Note – Color variation usually occurs due to wrong color profile or heat settings.
5. Sublimation design not transferring to blank
The most exciting moment for which every crafter waits is when you finally pull off the transfer paper to see a vibrant image on the substrate. Then when you see just yellow residue instead of artwork, it is such a let down. If this happens to you, it could be because of.
- You’re not using high quality sublimation ink.
- The substrate is not having the right amount of polyester material or coating to make a bond with sublimation ink. Always make sure the substrates are made for sublimation work.
- You were not using the right heat settings for proper image transfer. So use an infrared thermometer to check the temperature and make sure it is high enough for the printing process.
- Now allowing enough pressing time. If you are pressing the print for very less time then the image will not transfer properly. There are many substrates which need around 1 minute or higher. Always check the substrate you’re working with and choose time settings accordingly.
To know the right time and temperature, check the article here.
Quick Fix
- Check if blank has polyester coating
- Increase pressing time slightly
- Ensure correct temperature for material
- Use firm and even pressure while pressing
- Preheat blank for 5–10 seconds to remove moisture
Note – Low polyester content prevents ink bonding.
6. Ghosting and bleeding problem
Bleeding and ghosting are very common mistakes in sublimation printing. Some common causes of these issues are.
- There could be some moisture present on the substrate so when you are pressing it, the moisture prevents the proper transfer of the ink. A simple fix for this issue is you can pre – press the blank for around 10 seconds to make it moisture free.
- Your transfer paper is shifting when you lift open the heat press, which can result in ghosting. It is because the substrate is still hot enough to accept the ink from the transfer, which has just shifted or moved. So to avoid it, make sure your transfer is fixed well using adhesive tape so that it does not shift during pressing. Also, you should open your heat press slowly to avoid any movement of the transfer paper. Here is a tutorial on how to use a heat press.
- Always use a blow out sheet for covering your sublimation transfers as the artwork can actually transfer to the platen of heat press which will be then transferred to the next substrate. So, make sure you are always using a clean and new blow out sheet.
Quick Fix
- Secure design using heat resistant tape
- Avoid moving paper while lifting heat press
- Preheat substrate to remove moisture
- Open heat press slowly after pressing
- Use blowout sheet or butter paper for protection
Note – Ghosting occurs when design shifts during pressing.
7. Blank or light patches after pressing
Whenever you see a light or blank area of the pressed material, it can be due to the uneven heat generated from your heat press or maybe due to the presence of moisture on the substrate. This printing method requires high heat for printing artwork correctly and the presence of moisture prevents this even heat distribution so the artwork is not transferred completely on the substrate. Here are the tricks which I use to prevent it.
- Use an infrared thermometer to check the temperature of multiple areas of your heat press platen to see if there is any cold spot.
- Pre press your substrate to eliminate any moisture content.
- Avoid using teflon sheets as a blow out material as it can trap moisture. You can use a plain white blow out paper for better protection from excess ink.
- Make sure to apply even press all across your press as uneven press can also result in poor printing.
Quick Fix
- Ensure even pressure across entire surface
- Check heat press platen temperature consistency
- Preheat substrate to remove moisture
- Avoid wrinkles in fabric before pressing
- Use flat surface for proper pressure distribution
Note – Uneven heat causes incomplete transfer.
8. Lines appearing around the sublimation design
Substrates which are soft like towel, neoprene, linen and shirt don’t need heavy pressure while pressing. If they are pressed too heavily then the edges of transfer paper may leave a line on these blanks.
This can be easily prevented by using less pressure on the heat press. You can also tear the edges of sublimation paper so it is not a hard solid edge. Also, use the lint roller after heat pressing to fluff up the fiber’s flattened areas.
To know sublimation tips for beginners, you can check a detailed article here.
Quick Fix
- Reduce excessive pressure while pressing
- Tear edges of sublimation paper to soften edges
- Avoid thick paper edges creating pressure marks
- Ensure blank surface is smooth and wrinkle free
Note – Too much pressure can leave visible paper edges.
9. Faded sublimation prints
For getting a better print you always need a polyester blend or a polymer coated substrate. Substrates having sufficient polymer content provide beautiful and vibrant prints. Less polyester content fabric provides faded/lighter print which is good for vintage look but not for every design.
Quick Fix
- Use fabric with minimum 65% polyester content
- Increase temperature within recommended range
- Use high quality sublimation ink
- Ensure correct pressing time
- Avoid cotton fabric for sublimation printing
Note – Low polyester material produces dull prints.
10. Blue dots or lint marks on sublimation print
If small blue specks are appearing on your substrate then it is because of the lint which is heat pressed. The worst thing is that these blue specks are dyed permanently on the substrate and will not be removed even after multiple washes. For preventing it, apply a lint roller on the blank before pre – pressing it and then do it again twice. Make sure to do it more than once.
Quick Fix
- Use lint roller before heat pressing
- Clean surface to remove dust particles
- Preheat blank for few seconds
- Avoid working in dusty environment
- Store blanks in clean dry area
Note – Dust particles become permanently visible after pressing.
Common Sublimation Problems and Solutions
| Problem | Possible Cause | Solution |
| Banding lines on print | Clogged printer nozzle or low ink flow | Run nozzle cleaning and use printer regularly |
| Sublimation colors look dull | Low temperature or incorrect heat settings | Increase temperature and ensure correct time setting |
| Design not transferring to blank | Low polyester content or wrong substrate | Use polyester coated blanks or 65%+ polyester fabric |
| Ghosting or shadow effect | Transfer paper moved during pressing | Use heat resistant tape and avoid shifting paper |
| Blue dots or small spots | Dust or lint on material | Use lint roller before heat pressing |
| Faded sublimation print | Fabric has low polyester percentage | Use high polyester content material for vibrant results |
| Color mismatch after pressing | Incorrect ICC profile or printer settings | Install correct ICC profile and check color settings |
| Light or blank patches on print | Uneven heat or moisture in fabric | Preheat material to remove moisture before pressing |
| Lines around design edges | Too much pressure or sharp paper edges | Reduce pressure and tear paper edges slightly |
| Ink marks or roller lines | Ink not dried properly on sublimation paper | Allow print to dry before pressing |
Recommended tools to avoid sublimation printing mistakes
Using correct tools can prevent most sublimation issues like banding lines, faded colors, ghosting, dull prints and transfer issues. Here are the tools I recommend
Sublimation printer (Beginner friendly)
Recommended options:
- Epson SureColor F170 Sublimation Printer – Best dedicated sublimation printer for consistent color results
- Epson EcoTank L3250 – Budget friendly option for beginners (converted for sublimation)
- Epson EcoTank L3210 – Good entry level printer for home sublimation setup
These printers help avoid banding, dull colors and ink flow issues.
Sublimation Paper (Prevents Ghosting & Faded Prints)
Recommended options:
- A-Sub Sublimation Paper 125 GSM – sharp print transfer and fast drying
- Printers Jack Sublimation Paper – good color brightness
- Koala Sublimation Paper – smooth ink absorption and less smudging
Good paper helps prevent pinwheel marks and faded prints.
Heat Press Machine (Avoids Uneven Transfer)
Recommended options:
- Fancierstudio 15×15 Heat Press – consistent heat distribution
- PowerPress 15×15 Heat Press – good for beginners and small business
- Vevor Heat Press – stable pressure and temperature control
A quality heat press prevents ghosting and blank patches.
Heat Resistant Tape (Prevents Design Movement)
These tapes hold the design in place and prevent ghosting effect during pressing.
Lint Roller (Prevents Blue Dots on Prints)
Lint rollers remove dust particles that cause blue dots and unwanted marks on sublimation prints.
Optional but Helpful Tools
- Teflon sheet or butcher paper – protects heat press plate
- Infrared thermometer – checks accurate temperature
- Polyester coated blanks – improves color vibrancy
Conclusion
These are some common mistakes in sublimation printing which as a beginner you may do in your projects. Following the precautionary steps will help you avoid it, and you can get beautiful designs easily. If you are facing any other challenge while doing your sublimation transfer, let me know in comments or you can email me.
FAQs
Q – Why is my sublimation print not bright?
Sublimation prints may look dull because of low temperature, poor ink quality, incorrect ICC profile and low quality polyester fabric.
Q – Why is my sublimation leaving marks around design?
Lines around design generally appear when too much pressure is applied or the edge of sublimation paper is too sharp.
Q – How can I prevent ghosting in sublimation printing?
You should secure the design using a heat resistant tape and avoid moving transfer paper while lifting heat press.


I always was concerned in this subject and still am, thankyou for clear ideas.
Like good work on this website.
Definitely, what a magnificent blog and instructive posts, I will bookmark your blog.Have an awsome day!
you are in reality a just right webmaster. The website loading speed is incredible. It seems that you’re doing any unique trick. In addition, The contents are masterpiece. you’ve performed a magnificent activity in this topic!