Heat press is the best device for printing sublimation projects as it offers versatility, consistent pressure & temperature, better ink transfer, prints large surfaces, reduces risk of ghosting.
Using this machine will not only improve the quality of your artwork but it will also streamline the entire printing process, making it a necessary tool for crafters.
But, have you ever thought about using an iron instead of a heat press?
Yes, you can use iron instead of heat press for some projects, however it depends on what type of material you are going to print.
Sublimation indeed requires some investment, but if you are unable to invest too much then initially for small projects you can use iron instead of heat press.
Recently I experimented using iron for small projects and to my surprise, I got almost the same result. I found few of the materials are not compatible with iron press as you will not get vivid results, but still there are some substrates which will work best with iron. Let’s check out.
Can you use Iron instead of heat press?
You can use household iron in place of a heat press; however, you need to select the material which is compatible with the iron pressing. As an example, iron – on vinyl is best and recommended to use with the household ion. As the name says, with iron – on vinyl you are going to get vibrant results.
Steps to get started with Iron – on instead of the heat press
To begin with the process I will be using the heat – transfer vinyl or iron – on vinyl. Here are the items you need.
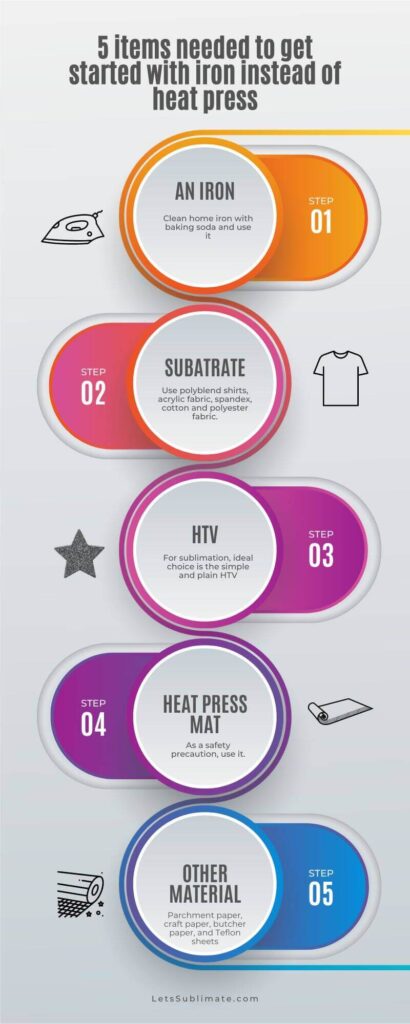
1. An iron – which one is best?
I would recommend buying a separate iron for sublimation projects as your ordinary iron must have stubborn stains, fabric link, debris or dust which is not suitable for desired prints.
But if you are having budget issues then you can also clean your regular iron by applying baking soda paste. For this you should take 2 tablespoons of baking soda and add a spoon of water. Mix it and apply evenly. After keeping it for a few minutes, clean it using a gentle cloth piece.
Apart from it, I recommend using a non-steam iron as it has got a flat surface which makes good contact with HTV when compared to the iron having steam holes.
Keep in mind that steam iron will apply less heat which will result in wear and tear of the prints in no time.
2. Substrate material
For printing you can use polyblend shirts, acrylic fabric, spandex, cotton and polyester fabric. Apart from it you can also use many other substrates like metal, glass etc.
3. Heat transfer vinyl, iron – on vinyl, vinyl sheet
There are various designs and textures available on vinyl sheets. As an example, PU heat transfer vinyl is best for garments. Apart from it you can also use rainbow stripes, Cricut vinyl, glow in the dark and many other colorful patterns. For sublimation printing, the ideal choice is the simple and plain HTV as an already printed HTV will not work for dye – sub printing.
4. Heat press mat
Use a heat press mat as a safety precaution
5. Other important items
Parchment paper, craft paper, butcher paper, and Teflon sheets are used as a lining between material and heat press platen
Printing process
· Prepare the apparel by ironing it to eliminate the wrinkles.
· Next make a crease in the center by simply folding and pressing it.
· Now prepare the mirror inverted vinyl heat transfer by simply cutting and weeding it.
· Prepare the timer and preheat the iron evenly.
· Now apply the vinyl on the desired area where you wish to showcase the design and then cover it with butcher or Teflon paper.
· Next apply even pressure for around 30 seconds.
· As you are using home iron, you have to repeat this process if the vinyl is still not applied.
Four important factors to consider getting vibrant prints
1. Time
As we know that home iron does not have an inbuilt timer and in sublimation timing plays a vital role for successful prints. So, make sure you are using an external timer. It will eliminate the under – timing or over time.
2. Temperature
As you know, heat presses are equipped with temperature adjustment. HTV will need a high temperature of around 400 Celsius and it won’t be possible with a home iron. To get this temperature adjustment an advanced household iron is needed which has this setting.
Here, you cannot use temperature adjustments like medium to high or medium to low. A clear temperature range is needed for vinyl heat pressing.
But, if you do not have iron which has a clear temperature range you can preheat the one you have for 10 minutes and can use a thermometer to verify the actual temperature for avoiding any scorching or insufficient bonding.
3. Pressure
With a heat press you heat a consistent and even pressure on the substrate. Multiple vinyl materials need distinct pressure to get adhered. While using the iron you have to apply the firm and even pressure manually as per the vinyl material type. Be careful not to press too hard as it may distort the print.
4. Hot or cold peel – Make right choice
Multiple brands of vinyl often mention on their packet whether the vinyl sheets are hot peel or cold peel. Hot sheets generally involve removing the carrier sheets as soon as the pressing is done. This method permits rapid transfer of the vinyl on the substrate.
The heat makes the adhesive soft on the vinyl, enabling it to make a quick bond with the fabric’s fibers. This peeling is generally used with the heat transfer vinyl and the sublimation transfers.
On the other hand, cold peel needs to wait until the transfer cools completely before removing the sheet. This method will let vinyl gradually bond with the fabric.
| Hot Peel | Cold Peel |
| Ideal for sublimation and HTV transfers. | Can be used for sublimation and HTV transfers. |
| Offers secure and quick bonds. | Need to wait until the transfer cools down. |
| Ability to preserve color vibrancy. | Offers long lasting results and durability. |
What is ideal for sublimation and HTV?
| Sublimation | HTV |
| Heat press is preferred as the ink needs to be completely infused in the fabric. If proper heat & pressure is not provided then the transfer will be less vibrant. | For iron – on vinyl or HTV you can use a household iron. HTV has a vinyl layer which adheres to the fabric when it is heated. |
| If you are using iron for sublimation, make sure you have proper control on pressure, temperature and time. | You can set household iron temperature between 300°F to 320°F or 149°C to 160°C to get the desired outcome. |
Can I use household iron for heat transfer paper?
Yes, you can use the home iron for heat transfer paper. But you should keep an eye on time, temperature and pressure. The results may not be as appealing as achieved with heat press. This is because heat presses offer a dedicated pressure and temperature which ensures strong bond between fabric and artwork.
How to use HTV with sublimation?
You can easily use HTV for printing fabrics and hard substrates. HTV is mostly used to print dark fabrics or cotton substrates. HTV is mainly used to print cotton or dark fabric.
Generally dark colors will not show the actual colors of sublimation as the ink used is transparent in nature. Also, the cotton being a natural fabric does not accept the ink unlike polyester fabric.
Along with this, the hard substrate needs a polyester coating to accept the sublimation ink sso if any of the material is non poly coated then you need to sublimate it with the help of HTV technology. Here are the steps about how you can use HTV for printing.
· Initially you need to download the design from the internet and upload it to a cutting machine like Cricut.
· Here we will be using the print then cut procedure with ‘Cricut sublimation printer’ of cricut design space for transfer paper printing.
· Next, mirror the design and insert the vinyl in the cricut for cutting the artwork.
· Once it is cut, weed it to remove the extra vinyl and transfer it to the career sheet.
· Now heat press the artwork on the substrate and then use the print then cut features on your cricut design space.
· Once your printed transfer paper is out, you need to insert it into the cricut for cutting the design which we have used on the heat pressed vinyl.
· Once your sublimation paper is cut then you need to press it over the already bonded vinyl. And your design is ready now!
Conclusion
Can you use iron instead of Heat Press is a very common doubt but with above explanation it must be clear that although iron is an affordable option but if you are looking for a long-term career in sublimation printing, then you must get a heat press.
But if budget is your limit, then you can begin with home press. However, I also recommend using a Cricut Easy Press instead of a heat press as it is very affordable and is of the same price tag as a household press. If you have any questions do let me know in the comments or you can message me.